

✍️ Week 1 lesson 5 of DataTalksClub 2022 data engineering zoomcamp, using 🎼 Docker Compose to build 🕸️ network with 🐘 Postgres and pgAdmin
Today, we will follow DataTalksClub's video: DE Zoomcamp 1.2.5 - Running Postgres and pgAdmin with Docker-Compose.
Which is part of the DataTalksClub 2022 Data engineering Zoomcamp week 1 repo.
In our last post, we learned how to convert a data ingestion notebook into a Python script. Then, we added the script to a container specifying that it should execute when the container runs, following DataTalksClub's video: DE Zoomcamp 1.2.4 - Dockerizing the Ingestion Script.

As you saw in the previous posts, a lot of configuration takes place in the terminal to build each docker container and the network. For cases like this, a better approach is to use Docker Compose, where we create one YML file with all the containers' configurations.
💬 In this lesson, we will:
- Install Docker Compose.
- Create a Docker Compose file.
- Run Postgres and pgAdmin containers with Docker Compose.
- Stop the containers.
This post is part of a series. Find all the other related posts here

💻 Installing Docker Compose
We will follow the Linux systems installation instructions in the Docker docs to install Docker Compose. First, we download and install it with
sudo curl -L "https://github.com/docker/compose/releases/download/1.29.2/docker-compose-$(uname -s)-$(uname -m)" -o /usr/local/bin/docker-composeand then, we add executable permissions to the binary with
sudo chmod +x /usr/local/bin/docker-compose✏️ Create a Docker Compose file
Let's peek into the Getting started Docker Compose guide to see the typical file components. Now, create a docker-compose.yaml file in our project working directory, following a similar structure as in the example from the docs, and fill it with our containers' configurations.
services:
    pgdatabase:
        image: postgres:13
        environment:
            - POSTGRES_USER=root
            - POSTGRES_PASSWORD=root
            - POSTGRES_DB=ny_taxi
        volumes:
            - "./ny_taxi_postgres_data:/var/lib/postgresql/data:rw"
        ports:
            - "5432:5432"
    pgadmin:
        image: dpage/pgadmin4
        environment:
            - PGADMIN_DEFAULT_EMAIL=admin@admin.com
            - PGADMIN_DEFAULT_PASSWORD=root
        ports: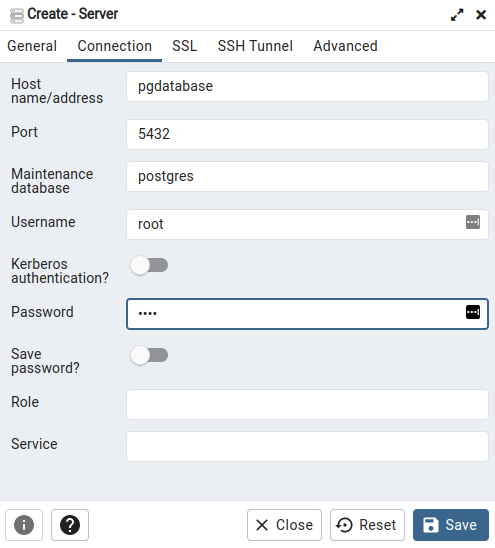
- "8080:80"When we run Docker Compose using this file, we will be able to access the database with the service name specified here (pgdatabase) from pgAdmin. Also, since we defined both services here, they automatically become part of the same network.
🏃♀️ Running Docker Compose
First, we must stop the containers we started in our last post (Postgres and pgAdmin) by going to their respective locked terminal window and typing ctrl+c. We can check if the containers are running with the docker ps command.
docker ps
CONTAINER ID   IMAGE            COMMAND                  CREATED       STATUS      PORTS                                            NAMES
93da4068bcb5   dpage/pgadmin4   "/entrypoint.sh"         10 days ago   Up 4 days   443/tcp, 0.0.0.0:8080->80/tcp, :::8080->80/tcp   pgadmin
4a01db1f9558 postgres:13 "docker-entrypoint.s…" 10 days ago Up 5 days 0.0.0.0:5432->5432/tcp, :::5432->5432/tcp pg-databasedocker ps
CONTAINER ID IMAGE COMMAND CREATED STATUS PORTS NAMESTo run Docker Compose, go to a terminal window and change directories until you reach our working directory (the one with the docker-compose.yaml file), and then type
docker-compose upwhich will run the containers specified in the docker-compose.yaml file.
docker-compose up
Starting 2_docker_sql_pgdatabase_1 ... done
Starting 2_docker_sql_pgadmin_1 ... done
Attaching to 2_docker_sql_pgdatabase_1, 2_docker_sql_pgadmin_1
pgdatabase_1 |
pgdatabase_1 | PostgreSQL Database directory appears to contain a database; Skipping initialization
pgdatabase_1 |
pgdatabase_1 | 2022-04-12 11:34:46.879 UTC [1] LOG: starting PostgreSQL 13.5 (Debian 13.5-1.pgdg110+1) on x86_64-pc-linux-gnu, compiled by gcc (Debian 10.2.1-6) 10.2.1 20210110, 64-bit
pgdatabase_1 | 2022-04-12 11:34:46.879 UTC [1] LOG: listening on IPv4 address "0.0.0.0", port 5432
pgdatabase_1 | 2022-04-12 11:34:46.879 UTC [1] LOG: listening on IPv6 address "::", port 5432
pgdatabase_1 | 2022-04-12 11:34:46.939 UTC [1] LOG: listening on Unix socket "/var/run/postgresql/.s.PGSQL.5432"
pgdatabase_1 | 2022-04-12 11:34:47.048 UTC [31] LOG: database system was shut down at 2022-04-12 11:34:40 UTC
pgdatabase_1 | 2022-04-12 11:34:47.095 UTC [1] LOG: database system is ready to accept connections
pgadmin_1 | [2022-04-12 11:34:53 +0000] [1] [INFO] Starting gunicorn 20.1.0
pgadmin_1 | [2022-04-12 11:34:53 +0000] [1] [INFO] Listening at: http://[::]:80 (1)
pgadmin_1 | [2022-04-12 11:34:53 +0000] [1] [INFO] Using worker: gthread
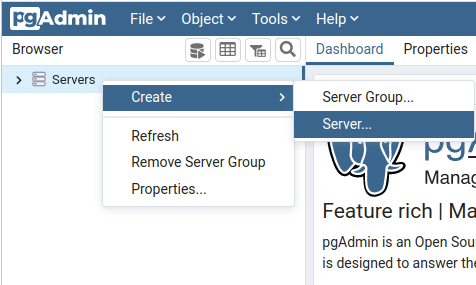
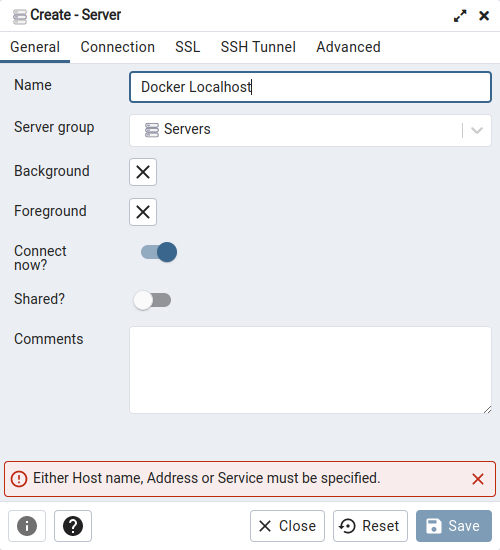
pgadmin_1 | [2022-04-12 11:34:53 +0000] [80] [INFO] Booting worker with pid: 80We can now go to a web browser and refresh the pgAdmin tab (localhost:8080), log in with the credentials specified in the docker-compose.yaml file and configure the server again, as shown below. To get to the server configuration screen, MB1 on the Server tab on pgAdmin left pane, then MB2 over it, and follow Create > Server...
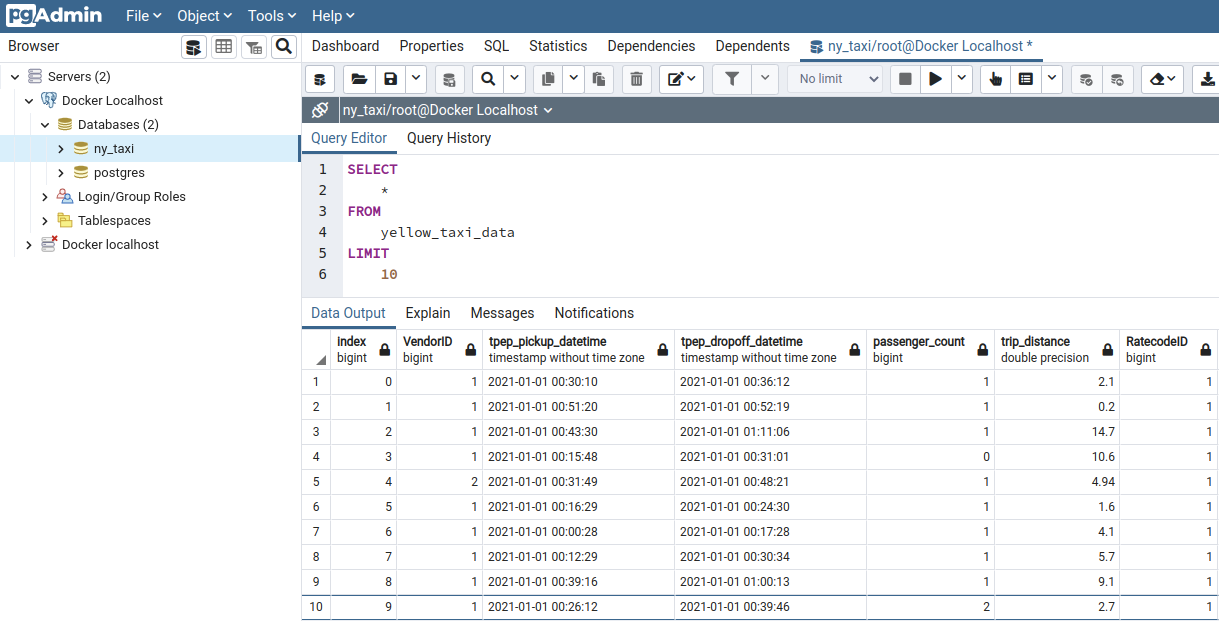
After completing the server configuration, MB1 on the Save button. Now we can check if the data is still there by using pgAdmin's query tool. If you need a refresher on how to do this, we wrote the details in our week 1 lesson 3 post.
🛑 Stopping docker-compose
Typically, we will start docker-compose in detached mode with
docker-compose up -dso the terminal doesn't get locked by the running process. Since we didn't start it with this option, we must exit the process with ctrl+c and then stop the containers with
docker-compose down📝 Summary
In this post we:
- Installed Docker Compose.
- Created a Docker Compose file.
- Ran Postgres and pgAdmin containers with Docker Compose.
- Stopped the containers.

In our next lesson, we will flex our SQL muscle 💪 by loading the taxi zones lookup table and reviewing JOIN and GROUP BY operations.
